Monthly Archives: March 2021


Color Knit Bag

Color Knit Bag, by Lisa Gentry

Download free pattern: https://www.yarnspirations.com/red-heart-color-knit-bag/RHK0103-021406M.html

Skill Level: Easy (allegedly, in Julie’s opinion)

Materials: size 8 straight needles, 2 wooden handles, yarn needle

Yarn: size 4 (medium or worsted weight yarn, minimum of 2 colors. Make note of colors you are using. ex: color A=gray, color B=white, color C=lavender)

Bag is worked in stockinette stitch (knit all stitches on right side~odd rows, purl all stitches on wrong side~even rows).

When working rows with 2 colors, carry colors loosely across wrong side of work.

With yarn color A, cast on 49 stitches (NOT 109 stitches like the downloaded pattern may read)

Row 1: K color A to end

Row 2: [P3 color A, P3 color B] to last stitch, P1 color A

Row 3: K1 color A, [K1 color B, K1 color A, K2 color B, K2 color A]

Row 4: P1 color A, [P3 color B, P3 color A]

Row 5: K color B to end

Row 6: P color B to end

Row 7: K color B to end

Row 8: P1 color C, [P3 color B, P3 color C]

Row 9: K1 color C, [K1 color B, K1 color C, K2 color B, K2 color C]

Row 10: P3 color C, P3 color B to last stitch, P1 color C

Row 11: K color C to end

Row 12: P color C to end

Row 13: K color C to end

Row 14: [P3 color C, P3 color D] to last stitch, P1 color C

Row 15: K1 color C, [K1 color D, K1 color C, K2 color D, K2 color C]

Row 16: P1 color C, [P3 color D, P3 color C]

Row 17: K color D to end

Row 18: P color D to end

Row 19: K color D to end

Row 20: P1 color E, [P3 color D, P3 color E]

Row 21: K1 color E, [K1 color D, K1 color E, K2 color D, K2 color E]

Row 22: P3 color E, P3 color D to last stitch, P1 color E

Row 23: K color E to end

Row 24: P color E to end

Row 25: K color E to end

Row 26: [P3 color E, P3 color F] to last stitch, P1 color E

Row 27: K1 color E, [K1 color F, K1 color E, K2 color F, K2 color E]

Row 28: P1 color E, [P3 color F, P3 color E]

Row 29: K color F to end

Row 30: P color F to end

Row 31: K color F to end

Row 32: P1 color A, [P3 color F, P3 color A]

Row 33: K1 color A, [K1 color F, K1 color A, K2 color F, K2 color A]

Row 34: P3 color A, P3 color F to last stitch, P1 color A

Row 35: K color A to end

Row 36: P color A to end

After completing 36 rows, repeat this pattern once more and then repeat rows 1-24 after that. 96 rows total.

Bind off all stitches

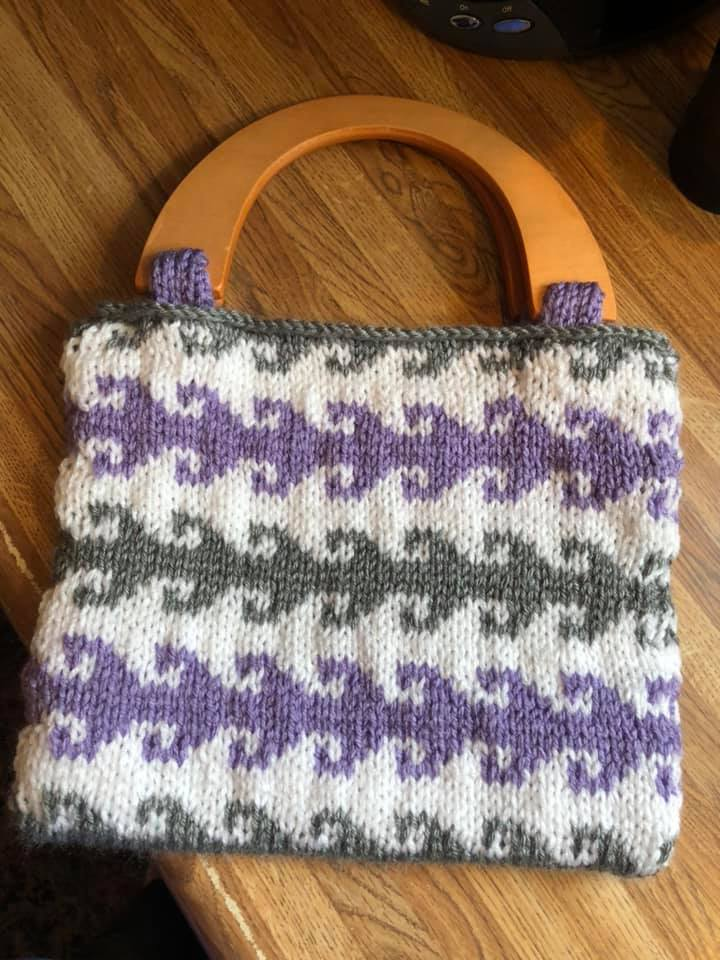
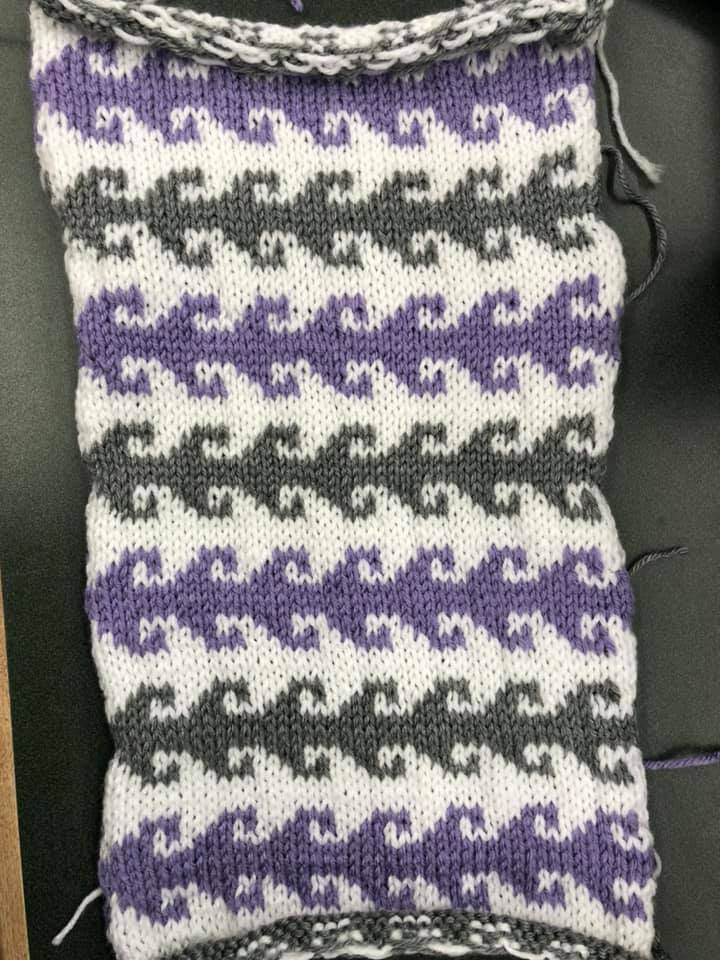
This is how mine turned out at this stage (front and back of project):

(Julie adds: Planning to sew a liner? I think I may just as well, since I don’t want the project to lose its shape with use. I will be storing real life clunky objects in this bag, like car keys.)

To make handle straps (make 4, NOT 2 like the pattern reads)

With color yarn of your choice, cast on 7 sts

Row 1 (right side): Slip 1 knitwise, knit across

Row 2 (wrong side): Slip 1 purlwise, purl across

Repeat rows 1-2 until piece measures 4 ½ inches. 

Bind off, leaving a long end for sewing.

Finishing:

Thread yarn needle with long length of yarn. Fold bag in half with right sides together. Match seams and rows. Sew seam.

This is the liner I made:

With bag flat on a hard surface, measure for Handle Strap placement. Thread needle using the long tail left on each strap. With wrong side of Handle Strap and wrong side of bag both facing you, sew each Handle Strap to Row 2 of bag. Thread strap through wooden handle, fold Handle Strap, with wrong sides together and matching cast-on edge with bind-off edge, sew securely. Repeat for opposite side of bag. 

Place liner inside bag and whip stitch around top of bag, tacking liner to knit bag.


Irish Soda Bread

Irish Soda Bread

Preheat oven to 350 degrees

Ingredients:

3 cups all-purpose unbleached flour

¾ teaspoon salt

½ cup sugar

1 teaspoon baking soda

½ teaspoon baking powder

¼ teaspoon cream of tartar

1/3 cup butter, cold, cut into pieces

1 1/3 cup buttermilk

Optional: 1/3 cup raisins or currents

Mix all together. It will be sticky. Sprinkle flour on countertop surface and on your hands. Knead dough 2 minutes. Form into round loaf. Place on a greased baking sheet and use sharp knife to make a cross slit on top. Bake 60 minutes. Enjoy with butter, jam, or just plain!


DIY Instant Pot Greek Yogurt

MAKE GREEK YOGURT WITH YOUR INSTANT POT 

If you have an instant pot with a yogurt setting, and just don’t know where to start, follow along here and start making your own healthy, delicious yogurt.   

SUPPLIES NEEDED

  • Instant Pot with Yogurt Setting 
  • Oven Mitts 
  • Long Handle Wooden Spoon 
  • ½ Gallon of whole milk, preferably grass fed organic 
  • Fine mesh Strainer 
  • Cheese cloth 
  • Large Bowl 
  • Small Bowl 
  • Whisk 
  • 1-2 tblsp of your favorite yogurt (Save some from your homemade for next time) 
  • Thermometer (digital or meat thermometer) 

STEP 1: POUR ENTIRE ½ GALLON INTO STAINLESS STEEL PAN INSIDE INSTANT POT.  CLOSE LID AND PRESS “YOGURT” BUTTON UNTIL IT READS BOIL.  LEAVE UNTIL IT BEEPS COMPLETING THE BOIL OF MILK. 

STEP 2:  FILL SINK WITH ICE WATER.  OPEN INSTANT POT AND CAREFULLY REMOVE HOT MILK WITH OVEN MITTS. SET INTO ICE BATH.   

STEP 3: GENTLY SKIM THE MILK FILM FROM THE TOP AND DISCARD.   

COOL TO 110 DEGREES, STIRRING SLOWLY.  KEEP CHECKING TEMP AS THE ICE BATH COOLS IT.   

STEP 4:  PLACE 1-2 TBLSP OF YOGURT (FOR CULTURE) INTO SMALL BOWL.  ADD ABOUT 1 CUP OF THE COOLED 110 DEGREE YOGURT AND WISK TILL SMOOTH.  

STEP 5: POUR BACK INTO POT AND STIR THROUGH.  MAKE SURE TO WIPE THE STAINLESS-STEEL POT DRY BEFORE RETURNING TO INSTANT POT.   

STEP 6: CLOSE LID.  YOU CAN TURN THE VENT TO OPEN OR CLOSED.  FOR THIS RECIPE IT DOES NOT MATTER.  PRESS YOGURT BUTTON UNTIL IT READS 8:00 HOURS.  

WHEN THE INSTANT POT BEEPS AND IS COMPLETE, IT WILL READ YOGURT ON THE SCREEN.  

IN THIS CONDITION, THE YOGURT IS SOFT AND READY TO EAT.  IF YOU WANT THICK, GREEK STYLE YOGURT, FOLLOW THE STEPS BELOW. 

LINE STRAINER WITH CHEESE CLOTH.  SET STRAINER OVER LARGE BOWL TO DRAIN WHEY FROM YOGURT.   

FOLD CHEESE CLOTH 

OVER THE TOP TO  

KEEP COVERED.   

PLACE IN REFRIGERATOR OVER NIGHT 

THE WHEY WILL DRAIN OUT AND YOU CAN THROW AWAY OR USE IN SHAKES OR OTHER USES FOR WHEY.  KEEP REFRIGERATED. 

NOW YOU HAVE THICK YOGURT READY FOR EATING AS SOUR CREAM, BAKING, COOKING, OR BLEND WITH FRUIT, RAW HONEY, VANILLA, OR ANYTHING YOU LIKE. KEEP IN REFRIGERATOR COVERED.  TO MAKE MORE, RESERVE A TABLESPOON OF THE HOMEMADE GREEK YOGURT TO CULTURE YOUR NEXT BATCH!  ENJOY!! 


White Chicken Chili

White Chicken Chili

Ingredients: 

1 medium yellow onion

1 rotisserie chicken (use both breasts + both thighs, debone and dice)

1 can corn, drained

1 can northern white beans, drained and rinsed

1-2 cups chicken broth

1 cup milk

7 oz. can chopped green chilis

½ teaspoon tabasco sauce

6 tablespoons flour

1 teaspoon chili powder

1 teaspoon cumin

½ teaspoon pepper

¼ cup butter

½ cup sour cream

1 cup shredded cheddar cheese

2 scallions, sliced

Cilantro to taste, chopped

Juice of 1 lime

To make:

  1. Sautee onion in skillet using 1 teaspoon olive oil and 1 teaspoon butter until translucent. I’ll list a good example of “order of ingredients” to place in the pot to make this chili, but honestly, you could dump everything in at once if you like since we’re not dealing with any raw ingredients (other than flour) that need to be cooked. Everything is just being heated. 
  1. In large pot, add chicken broth, chicken, corn, beans, onions. Stir on medium heat.
  1. Add chopped green chilis, tabasco, cumin, chili powder. Stir.
  1. Add butter, milk, flour, pepper, sour cream, cheese. Stir.
  2. Add lime juice, cilantro, green onion. Stir.
  1. Serve. 

Write a thank you note

How to write a proper thank you note:

A handwritten thank you is so important to be able to write. Once you know how to navigate one, you’ll be showing off your skills each time. 

  1. Use your best penmanship. 
  1. The opening line should address the recipient 

ex: “Dear Myles,”

If you are addressing a company or institution, try one of these examples:

Hello”, 

Dear Hiring Manager”,

Dear Friends of the Animal Shelter”,

  1. The body of the thank you note should consist of 3 unique sentences that express your gratitude and their thoughtfulness. Avoid repeating yourself. Spell check frequently.

Ex: 

I am so excited to use the new water filter you gave me for graduation. I can tell that I will be using this frequently after my workouts! Thank you so much for your thoughtful gift and for celebrating my big day with me.

Or: 

I was so pleased to receive your money gift. It was very generous and gracious of you to support my fundraiser this year. With your help, my team and I will be able to reach out to needy children who otherwise would have so little.

Or: 

Thank you for your wedding gift to us! We look forward to using the soup tureen at every special occasion, especially this coming Thanksgiving. We truly appreciate the support our family has given us as we begin our new venture together.

Notice in these examples that you have referenced the specific gift. Does anyone want to receive a thank you note from someone who can’t even remember what the gift was?  Not likely. Also, you have acknowledged that the donor was thoughtful, and that you have plans to make proper use of the gift.

  1. When closing your thoughts, you may choose “love”, “sincerely”, or others. I find “yours” to fit all sorts of relationships, both professional and personal. 

Discussion Guide: Flora & Ulysses, by Kate DiCamillo

Discussion Guide: Flora & Ulysses, by Kate DiCamillo

  1. When we first encounter Flora, she is quirky and cynical by nature. Do we believe this? 

(not entirely. Quirky, yes, like her parents. Cynical perhaps because her heart aches.)

  1. What is the first evidence that Ulysses is special?

(he lifts the vacuum cleaner over his head with one paw)

  1. Frequently Flora discovers a word that has such impact that she must repeat it aloud. What does this tell us about her?

(Flora is a bit awkward but also very detail oriented. She’s very smart but also very much a person with the same needs as everyone else)

  1. “Do not hope; instead observe” is repeated in the book. Is this quote meant to be scientific?

(yes, but also more than that. It is meant to be philosophical as well. Flora wants to guard her heart from more pain by not getting her hopes up.)

  1. Dr. Meescham has a painting of a squid apparently eating a boat filled with people. This is upsetting to Flora. Dr. Meescham explains, “Loneliness makes us do terrible things.” How does this fit in with the story?

(it helps Flora and us readers to be more forgiving and understanding of people who say or do desperate things because of their loneliness.)

  1. Flora recalls that in her comic books Dolores (a parakeet)  eventually becomes homesick for her own kind. Who do we believe this applies to?

(we believe it applies to Ulysses needing to be with other squirrels, but surprisingly, Flora feel it applies to her. 

  1. “The universe is expanding” means different things to different people. Explain the meaning presented in this book

(for Flora it is a sad expression of her feelings of isolation. For Ulysses, it is a joyfilled expression of possibility)

  1. Is Blundermeecen a real place?

(We don’t know but we suspect that it does not exist)

  1. In one of the final scenes, Flora’s mother arrives to be reunited with her baby. Who does she mean?

(Flora assumes she means Mary Ann, the lamp, but she means Flora.)

  1. Ulysses writes a final poem to Flora. What does he share in it?

(Ulysses shares that Flora is everything in this ever-expanding universe)

Vocabulary list 

Anticlimactic – causing disappointment at the end of an exciting or impressive series of events.

Appellation – a name or title

Arch-nemesis – a long-standing rival

Capacious – having a lot of space inside; roomy

Causation – the action of causing something

Cogitation – the action of thinking deeply about something

Cryptic – having a meaning that is mysterious

Cynic – a person who believes that people are motivated purely by self-interest rather than acting for honorable or unselfish reasons

Disdain – consider to be unworthy of one’s consideration

Fraught – causing or affected by anxiety or stress

Heimlich Maneuver – rescue treatment for choking victims

Heinous – very bad or evil

Incandescent – full of strong emotion; passionate

Indomitable – impossible to subdue or defeat

Inordinately – excessive

Irrevocable – not able to be changed, reversed, or recovered; final

Malfeasance – wrongdoing, especially by a public official

Mundane – lacking interest or excitement; dull

Obfuscation – the action of making something obscure, unclear, or unintelligible

Obliged – be indebted or grateful

Positing – assume as a fact; put forward as a basis of argument

Preternaturally – something that seems oddly abnormal and out of sync with everything else

Queried – asked or inquired

Sepulchral – gloomy; dismal

Stout – somewhat fat

Surreptitious – kept secret, especially because it would not be approved of

Unremitting -never relaxing or slackening; incessant 

Vanquished – defeat thoroughly

Vehemently – in a forceful, passionate, or intense manner; with great feeling

Wields – hold and use (a weapon or tool)


Milk Kefir

Kefir Is Easy to Make at Home

If you are unsure about the quality of store-bought kefir, you can easily make it at home.

Combined with fresh fruit, kefir makes for a healthy and scrumptious dessert.

Kefir grains are available in some health food stores and supermarkets, as well as online.

Supplies needed:

Glass mason jar(s) with ring lid 

Paper towel, or coffee filter 

Whole milk, organic/grass fed if available

Tablespoon of Kefir Grains

Fine mesh strainer (nylon if available)

Wooden spoon

(optional) Fresh or frozen fruit, honey

  • Put 1–2 tablespoons (14–28 grams) of kefir grains into a glass
    jar. The more you use, the faster it will culture.
  • Add around 2 cups (500 ml) of whole milk, preferably organic Milk from grass-fed cows is healthiest. Leave about an inch headspace at the top of the jar. 
  • Use a coffee filter or piece of paper towel with a ring or rubber band, to allow it to breath.
  • Leave it on the counter for 12–36 hours at room temperature.
  • Once it starts to look clumpy, and the grains rise up to the top, it’s ready.
  • Have a clean glass bowl or blender ready.  
  • Place the fine mesh colander over the bowl or blender.
  • Gently stir the kefir to combine any separated whey and milk.  Pour slowly into the colander and allow the milk kefir to drain into the bowl/blender.
  • After you gently strain out the liquid, the original kefir grains are left behind.

You can now put the grains in a new jar with some milk, and the process starts all over again.

  • You can blend it with your favorite fruit, use in place of buttermilk for baking and cooking, and you can keep growing your cultures with each new batch.  Use honey or your favorite sweetener.  Add a little vanilla and you have a healthy, refreshing smoothie. If you are not drinking it now, place in refrigerator for up to two weeks.  Shake well before use. 

Julie’s Apple Pie

Julie’s Apple Pie

This recipe is only for special occasions, or when you REALLY want to show your love, or you have botched things so badly that you need redemption. I’ve found that a truly great pie has no real shortcuts, so plan on this taking about half your day and most of your creative energy. Here’s a picture of my pie just before being baked:

I typically begin peeling and slicing 6-8 apples. We like Macintosh, but you may choose any apples you like. Place in mixing bowl and add:

1 cup sugar

1 teaspoon cinnamon

Dash nutmeg

Stir gently and place in a colander with mixing bowl beneath. As the apples release juice, you’ll catch the sugary drippings in a bowl for later. Just you wait. It’s gonna be epic. We’ll add the 2 tablespoons of corn starch just before baking. 

Next, you’ll begin the crust.

In large mixing bowl add:

2 cups flour

¼ teaspoon salt

Combine gently and add:

1 cup butter flavor crisco (I buy the premeasured sticks)

Using 2 butter knives, cut the crisco into the flour mixture until the pieces of crisco are small.

Now add ¼ cup cold water and stir using knives until blended. This is when I usually roll up my sleeves and gently massage the dough until it all comes together. 

Time for a tip: If you place your dough ball between 2 layers of wax paper (sprinkled with a dusting of flour), you may find it is easier to roll it out without too much cracking and breaking of the dough (or use a pastry sheet or a countertop but you’ll want plenty of flour on hand for dusting these surfaces). You may find that you are beginning to use salty language and subtly resenting the person who will be receiving this pie. Don’t worry, this is normal.

How do I know when my crust is large enough to fit the plate? Set the pie plate on top of your crust and see how it measures up. 

When your dough is ready, roll it up VERY GENTLY onto the rolling pin. If it starts to stick to the surface, hold your rolling pin in one hand and a butter knife in the other. You can gently scrape the dough from the countertop without ripping the rolled crust. 

Time for a tip: in a small bowl add:

1 egg

⅛ cup sugar

Whisk together and pour half onto your raw crust (Julie usually makes 2 pies at a time and uses up the whole mix). Why is this so important? The sugar will settle onto the crust and crystallize. The whisked egg will bake like a super thin scrambled egg (one that you’ll never taste considering all those juicy, tart apples). This will protect your bottom crust from getting all soggy when the pie bakes. You’ll really notice the difference when you are trying to serve your pie.

Place your pie plate in the refrigerator for 20-30 minutes. I’m told that the flaky crust is a chemical reaction caused by placing a cold pie in a hot oven. Works for me!

Back to the apples….you should find that they have released enough juice to pour into a small saucepan. 

Time for a tip: before serving your pie, boil the apple juice down to a syrup. It is excellent for dressing the dessert plate and also makes a lovely drizzle on top of your slice with vanilla ice cream. Your guests will be grateful. Trust me.

Now you may add your 2 tablespoons corn starch to your apples. This will help the pie to not puddle with apple juice once you cut into it. 

I always dot the top of my apple slices with a little butter. Because why not?

Repeat the “rolling out” process with your other dough ball, placing on top, and pressing edges together to seal them. Use a fork to make vent holes so that steam can escape. 

Time for a tip: use 2 long lengths of aluminum foil, criss-crossed, to place under your pie plate. Curl up the edges to form sides. This will prevent your crust edge from overbaking PLUS it will keep apple juices from overflowing and dripping on the floor of your oven. Please don’t ask me how many times I have tried burning the entire house down because of sugary apple pie drippings on the bottom of my hot oven. 

Bake at 325 degrees for 2 hours (if you like your apples cooked down to completely soft, otherwise, for a little al dente, bake at 350 for 90 minutes). 

Serve warmed with warm apple pie syrup (which you’ve made) with vanilla ice cream (a la mode), or with a piece of cheddar cheese (A pie without the cheese is like a kiss without the squeeze, by Grandmother used to say).

Enjoy!


Mini Leprechaun Hat Knitting Pattern

Mini Leprechaun Hat, by Julie Martin

Materials: size 5 dpns, 

yarn (worsted weight) in green, black, gold, 

yarn needle, 

2 sheets cardstock

1 small piece cardboard

CO = cast on

K = knit

P = purl

Sts = stitches

KFB = knit through the front and the back of 1 stitch (increase)

K2tog = knit 2 stitches together (decrease)

BO = bind off

CO 6 sts in green and divide on 3 dpns

Round 1: Kfb to end (12 sts)

Round 2: [Kfb, K1] to end (18 sts)

Round 3: K

Round 4: [Kfb, K1] (24 sts)

Round 5: K

Round 6: [Kfb, K1] to last st, K1

Round 7: K

Round 8: [Kfb, K1] (60 sts)

Round 9: K

Round 10: [Kfb, K1] (90 sts)

Round 11: P

Round 12: [K4, K2tog] (75 sts)

Round 13: K

Round 14: K

Round 15: K

Round 16: K

Round 17: [K8, K2tog] to last 5 sts, K5 (68 sts)

Round 18: K

Round 19: K

Round 20: K

Round 21: K

Round 22: [K8, K2tog] to last 8 sts, K8 (62 sts)

Round 23: K

Round 24: K

Round 25: K

Round 26: K

Round 27: [K6, K2tog] to last 6 sts, K6 (55 sts)

Switch to black yarn

Round 28: K

Round 29: K

Round 30: K

Round 31: K

Round 32: K

Round 33: K

Round 34: K

Round 35: K

Switch to green yarn

Round 36: K

Round 37: [Kfb, K1] to last st, K1 (82 sts)

Round 38: K

Round 39: K

Round 40: [Kfb, K3] to last 2 sts, K2 (102 sts)

Round 41: K

Round 42: K

Round 43: [Kfb, K5] 

BO

Cut a cardboard circle to fit the top of hat. Hot glue it into place to help it hold its shape.

Next, use gold/yellow yarn to embroider a simple square buckle.

Using cardstock, make a cylinder shape which will help the hat remain upright. This should just sit inside the hat without glue (unless you prefer to secure it with hot glue)

Using second piece of cardstock, cut out a donut shape to hot glue onto the brim of hat from the underside. Below you will see a view of the inside hat, showing all the paper supports.

Turn your hat right side up and enjoy!